How Custom Printing Startups Automate Design File Quality Checks
Starting a custom printing business sounds fun until your first batch of t-shirts comes out blurry or the colors look wrong.
For print-on-demand or custom merch startups, bad image uploads don’t just cause unhappy customers. They mean wasted money, ruined materials, and a hit to your brand’s reputation.
Sure, you can manually check every design before printing. But what happens when you’re receiving hundreds of orders every single day?
At that point, checking each file manually just isn’t practical.

That’s where image editing APIs help. Think of them as your automatic quality check team that works 24/7. They scan designs for issues like low resolution or wrong color formats, convert files if needed, and even give customers instant feedback, all without any manual work.
In this guide, we’ll look at how printing startups use automation to catch quality issues early and keep production running smoothly.
Key Takeaways
- Image quality matters: Use images with at least 150–300 DPI to avoid blurry prints. Automated tools can check this for you.
- Color mode confusion: RGB is for screens, while CMYK is for printing. Automatic conversion makes sure printed colors match what customers see.
- Instant feedback helps: Real-time checks during upload save time and prevent rejected orders later.
- Supports all file types: Automation can handle different file formats and prepare them for printing automatically.
- Saves money and materials: Catching mistakes early reduces reprints, waste, and unhappy customers.
Now that we know how automation helps, let’s look at what actually causes print quality problems.
The Print Quality Problem
Before we talk about the technical fixes, it’s important to understand what usually goes wrong.
Low Resolution Files
Customers often upload images they find online or on social media. These are made for screens (usually 72 DPI), not for printing. So, while a 500×500 pixel image looks fine on Instagram, it turns into a tiny, blurry 1.67-inch print at 300 DPI.
Wrong Color Mode
Most images are saved in RGB (Red, Green, Blue), because that’s how screens display color. But printers use CMYK (Cyan, Magenta, Yellow, Black).
This RGB vs CMYK difference can completely change how a design looks; that bright blue on your screen might print as a dull purple.
Unsupported File Formats
Customers upload all kinds of files: phone photos, PDFs, or even GIFs. But printers need specific formats like TIFF or high-quality JPEGs to work properly.
Wrong Dimensions
Sometimes, a design meant for a business card is uploaded for a banner, or vice versa. Without automated checks, these mistakes are only caught once printing starts, when it’s already too late.
Now that we’ve seen what usually goes wrong with design files, let’s see how image editing APIs can help fix those issues automatically.
How Image Editing APIs Automate Quality Control
Let’s fix the above problems with image editing APIs. Tools like Filestack make it easy to automate uploads, check images for problems, and get files ready for print without manual work.
We’ll go step-by-step, from creating the upload form to checking image quality and getting your files print-ready.
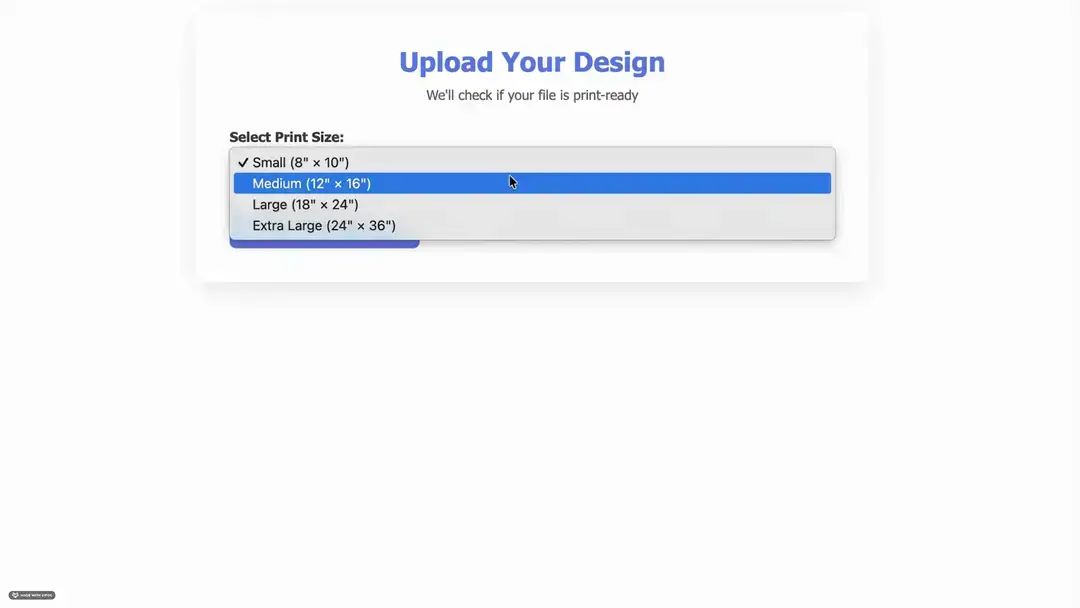
Step 1: Build the Upload Interface
First, let’s create a simple upload form where users can add their designs and get instant feedback.
Here’s the HTML code:
<!DOCTYPE html>
<html lang="en">
  <head>
    <meta charset="UTF-8" />
    <meta name="viewport" content="width=device-width, initial-scale=1.0" />
    <title>Image Editing API</title>
    <!-- Link to your external CSS file -->
    <link rel="stylesheet" href="styles.css" />
  </head>
  <body>
    <div class="container">
      <div class="upload-section">
        <h1>Upload Your Design</h1>
        <p class="subtitle">We'll check if your file is print-ready</p>
        <!-- ====== Select print size ====== -->
        <div class="product-selector">
          <label for="productSize">Select Print Size:</label>
          <!-- Users can choose a size from the dropdown -->
          <select id="productSize" name="productSize">
            <option value="small">Small (8" × 10")</option>
            <option value="medium">Medium (12" × 16")</option>
            <option value="large">Large (18" × 24")</option>
            <option value="xlarge">Extra Large (24" × 36")</option>
          </select>
        </div>
        <!-- ====== Upload Button ====== -->
        <!-- Clicking this will open the Filestack file picker -->
        <button id="uploadBtn" class="upload-btn">Choose File to Upload</button>
        <!-- ====== Validation Results ====== -->
        <!-- Once the upload is done, we'll show validation messages here -->
        <div
          id="validationResults"
          class="results-section"
          style="display: none"
        >
          <div id="resultsContent"></div>
        </div>
        <!-- ====== Image Preview ====== -->
        <!-- This section displays the uploaded image with its details -->
        <div id="imagePreview" class="preview-section" style="display: none">
          <h3>Preview</h3>
          <!-- Uploaded image will be shown here -->
          <img id="previewImage" src="" alt="Design preview" />
          <!-- Image details: resolution, size, and print quality -->
          <div class="image-info">
            <p>
              <strong>Dimensions:</strong> <span id="imageDimensions"></span>
            </p>
            <p><strong>File Size:</strong> <span id="imageSize"></span></p>
            <p>
              <strong>Print Quality:</strong> <span id="printQuality"></span>
            </p>
          </div>
        </div>
      </div>
    </div>
    <!-- ====== Add Filestack SDK and Script ====== -->
    <!-- Filestack SDK lets us upload files and get metadata easily -->
    <script src="<https://static.filestackapi.com/filestack-js/4.x.x/filestack.min.js>"></script>
    <!-- Your custom JavaScript for upload + validation -->
    <script src="script.js"></script>
  </body>
</html>
Now let’s style this upload interface with CSS.
Here’s what it will look like:

Step 2: Add the Upload Logic with Filestack Picker
Now, let’s make the upload button work using Filestack.
Instead of manually managing file inputs, we’ll use Filestack’s file picker, which opens a file chooser, handles uploads, tracks progress, and even manages errors automatically.
Step 2.1: Initialise Filestack and Setup Picker Configuration
In this step, we connect to Filestack using the API key, define print size options, and prepare the picker configuration.
// Initialise the Filestack client with your API key
const client = filestack.init("YOUR_API_KEY_HERE");
// Define product size options with corresponding dimensions (in inches)
const productSpecs = {
  small: { width: 8, height: 10, name: 'Small (8" × 10")' },
  medium: { width: 12, height: 16, name: 'Medium (12" × 16")' },
  large: { width: 18, height: 24, name: 'Large (18" × 24")' },
  xlarge: { width: 24, height: 36, name: 'Extra Large (24" × 36")' },
};
// Get references to DOM elements used for interaction and displaying results
const uploadBtn = document.getElementById("uploadBtn");
const productSize = document.getElementById("productSize");
const validationResults = document.getElementById("validationResults");
const resultsContent = document.getElementById("resultsContent");
const imagePreview = document.getElementById("imagePreview");
// Configure Filestack picker options (controls how the file upload UI behaves)
const pickerOptions = {
  accept: ["image/*"], // Accept only image files
  maxFiles: 1, // Allow only one file per upload
  fromSources: ["local_file_system", "url", "imagesearch"], // Allow upload from computer, URL, or image search
  uploadInBackground: false, // Disable background uploads (wait until upload finishes)
  // Triggered when upload completes successfully
  onUploadDone: (result) => {
    if (result.filesUploaded && result.filesUploaded.length > 0) {
      const uploadedFile = result.filesUploaded[0]; // Get the first uploaded file
      validateDesign(uploadedFile); // Call custom function to validate uploaded design
    }
  },
};
Step 2.2: Open Picker and Get Image Dimensions
In this step, we attach the picker to the upload button and create a small helper function to get the uploaded image’s width and height for later validation.
// Add a click event listener to the upload button
// When clicked, it opens the Filestack file picker
uploadBtn.addEventListener("click", () => {
  const picker = client.picker(pickerOptions); // Create a new picker instance with predefined options
  picker.open(); // Open the picker UI for file selection
});
// Helper function to get image dimensions (width & height) from a given image URL
function getImageDimensions(imageUrl) {
  return new Promise((resolve, reject) => {
    const img = new Image(); // Create a new Image object
    // When the image loads successfully, resolve the promise with its dimensions
    img.onload = function () {
      resolve({
        width: this.width,
        height: this.height,
      });
    };
    // If the image fails to load, reject the promise with an error
    img.onerror = function () {
      reject(new Error("Failed to load image"));
    };
    img.src = imageUrl; // Set the image source to trigger loading
  });
}
What this does:
- Opens the Filestack picker when the upload button is clicked.
- Once an image is selected, the picker automatically handles the upload.
- The getImageDimensions() function loads the uploaded image in memory and retrieves its width and height, which are later used for resolution and DPI validation.
Step 3: Validate the Uploaded File
Once the file is uploaded, we’ll use Filestack’s metadata API to check things like resolution, size, format, and aspect ratio.
If something doesn’t meet print standards, we’ll show clear feedback to the user.
Step 3.1: Validate Design and Combine Metadata
This function fetches metadata and image dimensions, merges them, runs validation checks, and triggers result display.
// Validate the uploaded design against selected product specifications
async function validateDesign(uploadedFile) {
  try {
    // Fetch file metadata (e.g., file size, MIME type) from Filestack
    const metadata = await client.metadata(uploadedFile.handle);
    // Get actual image dimensions (width & height in pixels)
    const dimensions = await getImageDimensions(uploadedFile.url);
    // Combine both metadata and image dimensions into a single object
    const fullMetadata = {
      ...metadata,
      width: dimensions.width,
      height: dimensions.height,
    };
    // Get the product size selected by the user (e.g., small, medium, large)
    const selectedSize = productSize.value;
    // Retrieve the corresponding size details
    const specs = productSpecs[selectedSize];
    // Perform multiple validation checks on the uploaded image
    const validation = {
      fileHandle: uploadedFile.handle, // Unique file identifier from Filestack
      fileUrl: uploadedFile.url, // URL to access the uploaded image
      metadata: fullMetadata, // Combined metadata + dimensions
      specs: specs, // Selected product specs
      checks: {
        resolution: checkResolution(fullMetadata, specs), // Verify if image resolution is sufficient
        fileSize: checkFileSize(metadata.size), // Ensure file size is within allowed limits
        format: checkFormat(metadata.mimetype), // Validate file type (e.g., JPEG, PNG)
        aspectRatio: checkAspectRatio(fullMetadata, specs), // Check if aspect ratio matches the product specs
      },
    };
    // Display validation results in the UI
    displayResults(validation);
    // Show image preview with metadata and validation info
    showPreview(uploadedFile.url, fullMetadata, validation);
  } catch (error) {
    // Handle and log any errors that occur during validation
    console.error("Validation error:", error);
    showError("Failed to validate file. Please try again."); // Show user-friendly error message
  }
}
What this code does:
- Fetches metadata (size, format, etc.) from Filestack.
- Gets the actual image width and height.
- Combines both sets of info into one object.
- Retrieves selected product specs (e.g., 8×10 in).
- Runs all validation checks (resolution, file size, format, aspect ratio).
- Displays results and a preview to the user.
Step 3.2: Check Image Resolution
This function checks if the uploaded image has a high enough resolution for printing (300 DPI is ideal).
// Function to check if the uploaded image meets the required print resolution
function checkResolution(metadata, specs) {
  // Calculate required pixel dimensions for high-quality print (300 DPI standard)
  const requiredPixelsWidth = specs.width * 300; // e.g., 8 inches × 300 = 2400 px
  const requiredPixelsHeight = specs.height * 300; // e.g., 10 inches × 300 = 3000 px
  // Get actual uploaded image dimensions (in pixels)
  const actualWidth = metadata.width;
  const actualHeight = metadata.height;
  // Calculate actual DPI (dots per inch) based on image dimensions and print size
  const actualDPIWidth = actualWidth / specs.width;
  const actualDPIHeight = actualHeight / specs.height;
  const actualDPI = Math.min(actualDPIWidth, actualDPIHeight); // Take the lower DPI as the limiting factor
  // Check if the image has at least the required pixel resolution for printing
  const isValid =
    actualWidth >= requiredPixelsWidth && actualHeight >= requiredPixelsHeight;
  let status, message;
  // Assign quality status and feedback message based on actual DPI
  if (actualDPI >= 300) {
    status = "excellent";
    message = `Perfect! Your image has ${Math.round(
      actualDPI
    )} DPI - excellent print quality.`;
  } else if (actualDPI >= 200) {
    status = "good";
    message = `Good quality. Your image has ${Math.round(
      actualDPI
    )} DPI - will print well.`;
  } else if (actualDPI >= 150) {
    status = "fair";
    message = `Acceptable quality. Your image has ${Math.round(
      actualDPI
    )} DPI - may show slight pixelation.`;
  } else {
    status = "poor";
    message = `Low quality. Your image has only ${Math.round(
      actualDPI
    )} DPI. We recommend at least 300 DPI for best results.`;
  }
  // Return a structured result with all relevant details
  return {
    valid: isValid, // Whether image meets minimum resolution requirements
    status: status, // Quality label: excellent, good, fair, poor
    message: message, // User-friendly feedback
    actualDPI: Math.round(actualDPI), // Rounded actual DPI
    requiredDPI: 300, // Standard print DPI
    actualPixels: `${actualWidth} × ${actualHeight}`, // Actual pixel dimensions
    requiredPixels: `${requiredPixelsWidth} × ${requiredPixelsHeight}`, // Required pixel dimensions
  };
}
What this code does:
- Calculates actual DPI based on image size and product dimensions.
- Compares it against the 300 DPI print standard.
- Rates the image as excellent, good, fair, or poor.
- Returns a summary with details and recommendations.
Step 3.3: Check File Size
Ensures the uploaded image isn’t too small (poor quality) or too large (slow processing).
// Function to check if the uploaded file size is within acceptable limits
function checkFileSize(fileSize) {
  // Define maximum and minimum file size thresholds
  const maxSize = 50 * 1024 * 1024; // 50 MB -- upper limit to prevent overly large uploads
  const minSize = 100 * 1024; // 100 KB -- lower limit to avoid low-quality or corrupted files
  // Convert bytes to megabytes for a user-friendly display
  const sizeInMB = (fileSize / (1024 * 1024)).toFixed(2);
  // If file size exceeds the maximum limit
  if (fileSize > maxSize) {
    return {
      valid: false,
      message: `File is very large (${sizeInMB}MB). This may slow down processing.`,
      status: "warning", // Indicates a non-critical issue (can still process, but with caution)
    };
  }
  // If file size is smaller than the minimum acceptable size
  else if (fileSize < minSize) {
    return {
      valid: false,
      message: `File is very small (${sizeInMB}MB). This may indicate low quality.`,
      status: "warning", // Warn user that the image might not print well
    };
  }
  // If file size is within acceptable range
  return {
    valid: true,
    message: `File size is good (${sizeInMB}MB).`,
    status: "success", // Indicates everything is fine
  };
}
What this code does:
- Checks if file size is within acceptable limits (100 KB – 50 MB).
- Warns if too small (blurry) or too large (slow processing).
- Approves files that fall in the ideal range.
Step 3.4: Check File Format
Checks whether the image format is print-friendly.
// Function to check if the uploaded file format is suitable for printing
function checkFormat(mimetype) {
  // List of supported high-quality image formats for printing
  const goodFormats = ["image/jpeg", "image/jpg", "image/png", "image/tiff"];
  // If the uploaded image format is one of the supported ones
  if (goodFormats.includes(mimetype)) {
    return {
      valid: true, // Format is acceptable
      message: `Format (${mimetype}) is suitable for printing.`, // Inform the user that format is good
      status: "success", // Mark as successful validation
    };
  }
  // If the format is not in the preferred list, flag a warning
  return {
    valid: false, // Format not ideal for print
    message: `Format (${mimetype}) will be converted to JPEG for optimal printing.`, // Inform about auto-conversion
    status: "warning", // Non-critical warning
  };
}
What this code does:
- Verifies the file is in a print-friendly format (JPEG, PNG, TIFF).
- Warns if the format is unsupported and will be auto-converted to JPEG.
Step 3.5: Check Aspect Ratio
Verifies if the image’s aspect ratio matches the selected print size to prevent unwanted cropping.
// Function to check if the image's aspect ratio matches the selected product's aspect ratio
function checkAspectRatio(metadata, specs) {
  // Calculate the aspect ratio (width ÷ height) of the uploaded image
  const imageRatio = metadata.width / metadata.height;
  // Calculate the aspect ratio of the selected product size
  const productRatio = specs.width / specs.height;
  // Allow a small difference (10%) between the two ratios
  const tolerance = 0.1;
  // Find the absolute difference between image and product ratios
  const ratioDiff = Math.abs(imageRatio - productRatio);
  // If the difference is within the acceptable range, it's a good match
  if (ratioDiff <= tolerance) {
    return {
      valid: true, // Ratios match closely enough
      message: "Image aspect ratio matches the product perfectly.", // Inform user of a perfect fit
      status: "success",
    };
  }
  // If the ratio difference exceeds the tolerance, warn the user
  return {
    valid: false, // Ratios don't match well
    message:
      "Image aspect ratio differs from product. Some cropping may occur.", // Warn about possible cropping
    status: "warning",
  };
}
What this code does:
- Compares the image’s aspect ratio with the chosen product size.
- Allows a 10% tolerance for slight differences.
- Warns the user if cropping might be required.
Step 4: Displaying Validation Results
After validating the file, we’ll show users a detailed summary of their design quality, generate a print-ready version using Filestack transformations and display a live preview.
Step 4.1: Display Validation Results
In this step, we’ll display the outcome of the image validation, showing resolution, DPI, and other design checks along with appropriate action buttons.
// Display validation results to the user
function displayResults(validation) {
  // Destructure validation data for easier access
  const { checks } = validation;
  const resolution = checks.resolution;
  // Default overall status (assume success initially)
  let overallStatus = "success";
  let overallMessage = "Your design is print-ready!";
  // Adjust status and message based on resolution and aspect ratio
  if (resolution.status === "poor") {
    overallStatus = "error"; // Poor quality image
    overallMessage = "Your design needs improvement";
  } else if (resolution.status === "fair" || !checks.aspectRatio.valid) {
    overallStatus = "warning"; // Some quality concerns
    overallMessage = "Your design may have quality issues";
  }
  // Build the main results HTML block dynamically
  let html = `
    <div class="result-${overallStatus}">
      <div class="result-message">${overallMessage}</div>
      <div class="quality-badge quality-${resolution.status}">
        Print Quality: ${
          resolution.status.charAt(0).toUpperCase() + resolution.status.slice(1)
        }
      </div>
      <div class="result-details">
        <ul>
          <li><strong>Resolution:</strong> ${resolution.message}</li>
          <li><strong>Actual Pixels:</strong> ${resolution.actualPixels}</li>
          <li><strong>DPI:</strong> ${resolution.actualDPI} (recommended: ${
    resolution.requiredDPI
  })</li>
          <li><strong>File Size:</strong> ${checks.fileSize.message}</li>
          <li><strong>Format:</strong> ${checks.format.message}</li>
          <li><strong>Aspect Ratio:</strong> ${checks.aspectRatio.message}</li>
        </ul>
      </div>
  `;
  // Add action buttons based on validation outcome
  if (overallStatus === "success" || overallStatus === "warning") {
    // Generate a print-ready URL for checkout
    const printReadyUrl = generatePrintReadyUrl(validation.fileHandle);
    // Provide "Proceed" and "Re-upload" options
    html += `
      <div class="action-buttons">
        <button class="btn-primary" onclick="proceedToCheckout('${printReadyUrl}')">
          Proceed to Checkout
        </button>
        <button class="btn-secondary" onclick="location.reload()">
          Upload Different File
        </button>
      </div>
    `;
  } else {
    // For poor-quality images, only show re-upload option
    html += `
      <div class="action-buttons">
        <button class="btn-secondary" onclick="location.reload()">
          Upload Higher Quality Image
        </button>
      </div>
    `;
  }
  // Close the main results container
  html += "</div>";
  // Insert the generated HTML into the results section
  resultsContent.innerHTML = html;
  // Make the results section visible
  validationResults.style.display = "block";
}
What this code does:
- Checks how good the uploaded design is and if it’s ready for printing.
- Decides the overall result: good, okay but not perfect, or needs improvement.
- Creates an HTML summary showing details like resolution, DPI, file size, and aspect ratio.
- Shows the right buttons: like “Proceed to Checkout” or “Upload Again”, based on the result.
Step 4.2: Generate Print-Ready URL
This step converts the uploaded image into a high-quality, print-ready file using Filestack’s transformation API.
// Create a print-ready image URL using Filestack's transformation API
function generatePrintReadyUrl(fileHandle) {
  // Apply transformations:
  // - Convert the image to JPEG format
  // - Use CMYK color space (standard for printing)
  // - Keep the highest quality (100%)
  // - Disable compression for best print results
  return `https://cdn.filestackapi.com/output=format:jpg,colorspace:cmyk,quality:100,compress:false/${fileHandle}`;
}
What this code does:
- Generates a transformed file URL with Filestack.
- Converts the image to CMYK color mode (for printing).
- Sets maximum JPEG quality and disables compression.
- Returns a direct link to the processed, print-ready image.
Step 4.3: Show Image Preview
In this step, we’ll display a live preview of the uploaded design along with file details like size, resolution, and DPI.
// Show image preview on the page
function showPreview(imageUrl, metadata, validation) {
  // Create a preview URL using Filestack's resize transformation (limits the image width to 600px for faster loading)
  const previewUrl = `https://cdn.filestackapi.com/resize=width:600,fit:max/${validation.fileHandle}`;
  const previewImg = document.getElementById("previewImage");
  // If the preview image fails to load
  previewImg.onerror = function () {
    console.error("Failed to load preview image");
    // Try showing the original image as a fallback
    previewImg.src = imageUrl;
  };
  // When the image loads successfully
  previewImg.onload = function () {
    console.log("Preview image loaded successfully");
  };
  // Set the image source to the resized preview URL
  previewImg.src = previewUrl;
  // Show image dimensions (e.g., 2400 × 3000 pixels)
  document.getElementById(
    "imageDimensions"
  ).textContent = `${metadata.width} × ${metadata.height} pixels`;
  // Convert file size to MB and display it
  const fileSizeInMB = (metadata.size / (1024 * 1024)).toFixed(2);
  document.getElementById("imageSize").textContent = `${fileSizeInMB} MB`;
  // Show print quality info
  document.getElementById(
    "printQuality"
  ).textContent = `${validation.checks.resolution.actualDPI} DPI (${validation.checks.resolution.status})`;
  // Finally, make the preview section visible
  imagePreview.style.display = "block";
}
What this code does:
- Loads a resized image preview using Filestack’s transformation API.
- Shows important details like dimensions, file size, and print DPI.
- Adds error handling, falls back to the original image if preview fails.
- Displays the preview area once the image is successfully loaded.
Step 4.4: Show Error Messages
Here, we create a clean and user-friendly error view to notify users of any upload or validation failures.
// Display an error message in the results section
function showError(message) {
  // Build the HTML structure for the error message
  resultsContent.innerHTML = `
    <div class="result-error">
      <div class="result-icon">✗</div>
      <div class="result-message">Error</div>
      <div class="result-details">
        <p>${message}</p>
      </div>
      <div class="action-buttons">
        <button class="btn-secondary" onclick="location.reload()">
          Try Again
        </button>
      </div>
    </div>
  `;
  // Make the error message section visible
  validationResults.style.display = "block";
}
What this code does:
- Displays a clearly formatted error message when something goes wrong.
- Inserts the message dynamically into the results container.
- Provides a “Try Again” button to re-upload the file.
- Make sure the error box becomes visible immediately.
Step 4.5: Proceed to Checkout
This final step is a placeholder function for redirecting users to the checkout flow once their design passes validation.
// Handle the "Proceed to Checkout" action (currently a placeholder)
function proceedToCheckout(printReadyUrl) {
  console.log("Proceeding to checkout");
  alert("Proceeding to checkout");
  // In a real application, redirect the user to the checkout page
  // and pass the print-ready file URL as a query parameter:
  // window.location.href = `/checkout?file=${encodeURIComponent(printReadyUrl)}`;
}
What this code does:
- Acts as a temporary checkout trigger for testing flow.
- Logs and alerts when the checkout starts.
- Prepares for future integration with a real checkout page that uses the print-ready file URL.
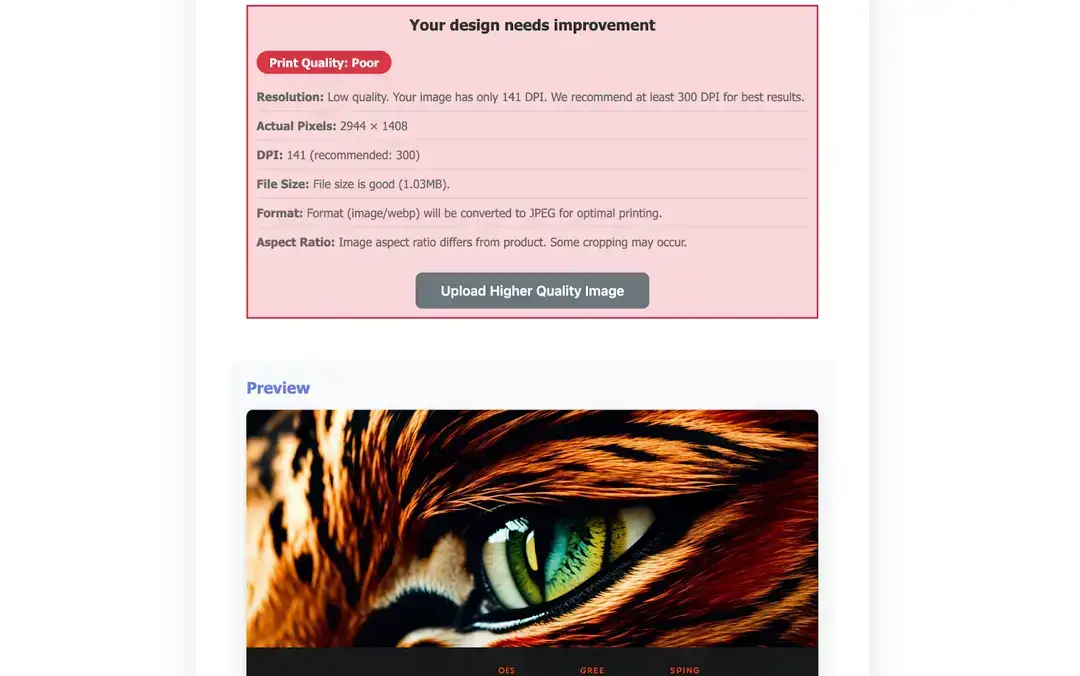
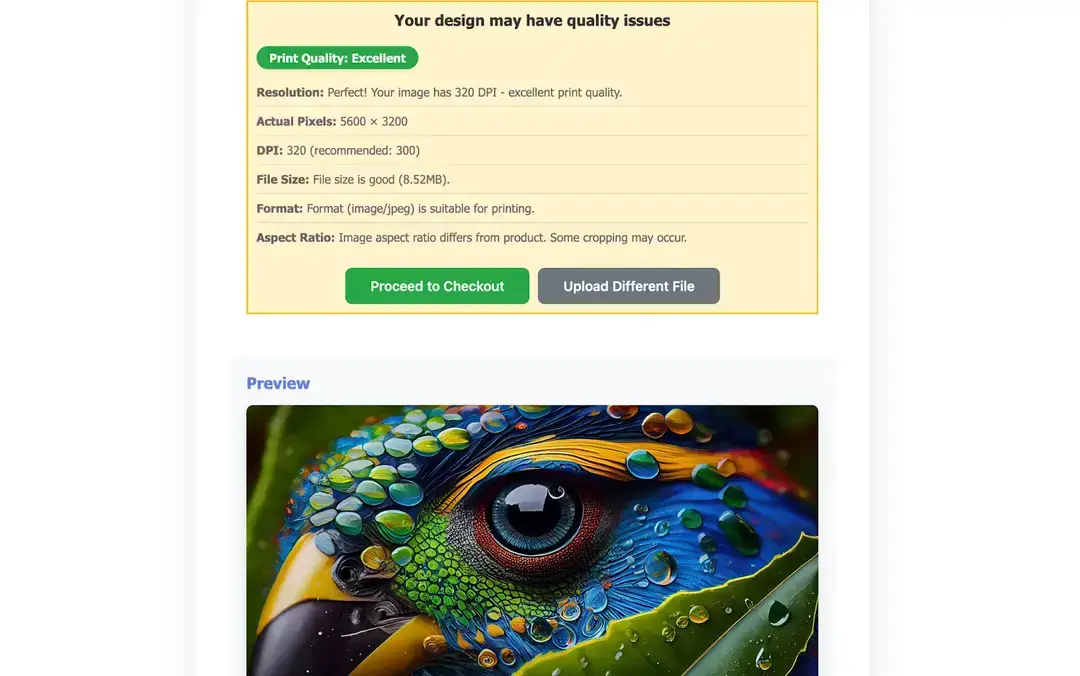
Here’s how the validation results look, showing both an error case and a successful, print-ready upload:
Step 5: Color Mode Conversion
In this step, we’ll improve our existing functions so that uploaded designs are properly converted from RGB to CMYK, resized to 300 DPI, and optimised for printing.
Step 5.1: Updated displayResults()
function displayResults(validation) {
  const { checks, specs } = validation; // CHANGED: 'specs' is now included from validation to pass product details
  const resolution = checks.resolution;
  let overallStatus = "success";
  let overallMessage = "Your design is print-ready!";
  // Determine overall status and message
  if (resolution.status === "poor") {
    overallStatus = "error";
    overallMessage = "Your design needs improvement";
  } else if (resolution.status === "fair" || !checks.aspectRatio.valid) {
    overallStatus = "warning";
    overallMessage = "Your design may have quality issues";
  }
  // Build the HTML output dynamically
  let html = `
    <div class="result-${overallStatus}">
      <div class="result-message">${overallMessage}</div>
      <div class="quality-badge quality-${resolution.status}">
        Print Quality: ${
          resolution.status.charAt(0).toUpperCase() + resolution.status.slice(1)
        }
      </div>
      <div class="result-details">
        <ul>
          <li><strong>Resolution:</strong> ${resolution.message}</li>
          <li><strong>Actual Pixels:</strong> ${resolution.actualPixels}</li>
          <li><strong>DPI:</strong> ${resolution.actualDPI} (recommended: ${
    resolution.requiredDPI
  })</li>
          <li><strong>File Size:</strong> ${checks.fileSize.message}</li>
          <li><strong>Format:</strong> ${checks.format.message}</li>
          <li><strong>Aspect Ratio:</strong> ${checks.aspectRatio.message}</li>
        </ul>
      </div>
  `;
  // CHANGED: Passing 'specs' to generatePrintReadyUrl to allow CMYK conversion and resizing based on product specs
  if (overallStatus === "success" || overallStatus === "warning") {
    const printReadyUrl = generatePrintReadyUrl(validation.fileHandle, specs);
    const safeName = encodeURIComponent(specs.name);
    // CHANGED: Added 'safeName' parameter for better file naming in checkout (placeholder for later use)
    html += `
      <div class="action-buttons">
        <button class="btn-primary" onclick="proceedToCheckout('${printReadyUrl}', '${safeName}')">
          Proceed to Checkout
        </button>
        <button class="btn-secondary" onclick="location.reload()">
          Upload Different File
        </button>
      </div>
    `;
  } else {
    html += `
      <div class="action-buttons">
        <button class="btn-secondary" onclick="location.reload()">
          Upload Higher Quality Image
        </button>
      </div>
    `;
  }
  // Inject HTML into the results section
  html += "</div>";
  resultsContent.innerHTML = html;
  validationResults.style.display = "block";
}
Step 5.2: Updated generatePrintReadyUrl()
function generatePrintReadyUrl(fileHandle, specs) {
  // CHANGED: Use product specs to dynamically calculate target dimensions in pixels
  // Convert inches (or product dimensions) to pixels using 300 DPI (standard print quality)
  const pixelWidth = specs.width * 300;   // Width in pixels at 300 DPI
  const pixelHeight = specs.height * 300; // Height in pixels at 300 DPI
  // CHANGED: Added Filestack transformations for both resizing and CMYK conversion
  const transformations = [
    // Resize the image to exact product dimensions with cropping to avoid distortion
    `resize=width:${pixelWidth},height:${pixelHeight},fit:crop`,
    // Convert to CMYK for printing, keep JPEG format, disable compression for top quality
    'output=format:jpg,colorspace:cmyk,quality:100,compress:false'
  ].join('/'); // Join transformations into a single Filestack URL path
  // CHANGED: Updated to use Filestack CDN base URL with applied transformations
  return `https://cdn.filestackcontent.com/${transformations}/${fileHandle}`;
}
What this code does:
- Calculates pixel dimensions from inches × 300 DPI for accurate print sizing.
- Uses Filestack transformations to:
- Resize the image precisely for the selected print size.
- Convert color mode from RGB → CMYK for printing.
- Output a high-quality, non-compressed JPEG.
- Returns the final print-ready file URL.
Step 5.3: Updated proceedToCheckout()
This version sends both the processed file URL and product name to the checkout flow for smoother order handling.
function proceedToCheckout(printReadyUrl, productName) {
  console.log("Proceeding to checkout with:");
  console.log("Product:", productName);
  console.log("Print-ready URL:", printReadyUrl);
  alert("Your file has been processed and is ready for printing!");
  // In production, redirect to checkout:
  // window.location.href = `/checkout?file=${encodeURIComponent(printReadyUrl)}&product=${encodeURIComponent(productName)}`;
}
What this code does:
- Logs both the product name and print-ready file URL for debugging.
- Displays an alert confirming that the file is ready for checkout.
Best Practices
Here are some tips to make your print validation process smoother and easier for users.
1. Set Practical Quality Standards
Not every product needs super-high resolution. Choose DPI (dots per inch) based on the type of product.
- Posters or premium photos: 300 DPI (best quality)
- T-shirts or fabric prints: 150–200 DPI (fabric hides small flaws)
- Large banners or boards: 100–150 DPI (viewed from a distance)
- Mugs or small curved surfaces: around 200 DPI
2. Show Quality Comparisons
Help users see what good and bad quality looks like.
- Show side-by-side examples labeled “Poor,” “Fair,” and “Print-ready.”
- This helps customers understand what needs improvement.
3. Educate Customers
Add small info tips to explain things.
- Define terms like DPI, aspect ratio, and CMYK.
- Use hover tooltips or small info icons in your UI.
- It helps users learn and builds trust in your platform.
Common Mistakes to Avoid
Here are a few things that can go wrong when making print validation tools and how to avoid them.
1. Ignoring Color Conversion
RGB colors (used on screens) often look dull in print.
- Always convert images to CMYK before printing.
- This ensures colors appear more accurate on the final product.
2. Not Handling Unusual Files
Sometimes users upload strange or broken files.
- Handle large, corrupt, or oddly shaped images properly.
- Show clear, friendly error messages instead of “Something went wrong.”
3. Bad Mobile Experience
Many users upload from their phones.
- Make sure your uploader works well on small screens.
- Handle large files smoothly.
- Keep the flow simple and easy to use on small screens.
4. No Backup for API Failures
APIs can fail; plan for it.
- Show a helpful message if upload or validation fails.
- Let users retry or upload manually.
5. Only Testing Perfect Files
Real users don’t upload perfect files.
- Test with real customer images (with permission).
- Try different formats, sizes, and devices.
- This helps you find and fix real-world problems early.
Conclusion
Starting a custom printing business is exciting, but checking every design file manually can be a real pain.
With image editing APIs, you can automate the process: spot low-quality images, switch color modes to CMYK, and make sure every file is ready to print before it reaches the printer.
This saves time, reduces waste, and gives customers a smoother experience. Users get instant feedback without endless edits and know their designs will look just as good in print as on screen.
Whether you print t-shirts, posters, or mugs, tools like Filestack make it simple to add upload checks, image fixes, and live previews, all with just a few lines of code.
About the Author
Shefali Jangid is a web developer, technical writer, and content creator passionate about building intuitive developer tools and educational resources. She shares tutorials, code snippets, and practical tips on her blog, shefali.dev, helping developers create better web experiences with clean, efficient, and accessible code.
Resources for Further Reading
- Filestack
- RGB vs CMYK Difference
- Print Resolution Guide
- Filestack’s Metadata API
- Filestack Transformations
- GitHub Repo for the Complete Code